Avoiding Unwanted PvP in Aion
Written for the NA/EU release
Last Updated: 18 August 2009
Introduction:
I thought it might be helpful to put a guide of this nature up for those enthusiastic PvE players that are considering buying Aion but aren't so thrilled about the idea of being thrown into a PvPvE environment. At the very least, I hope this guide will explain to you the nature of PvP that you will encounter in Aion, when you should expect to encounter it, and how to "manage" your gaming to suit your own playstyle.
That said, this guide is not just directed at PvE players. In Aion there are times when we all need to concentrate on quests, or we are going solo, or we are just not in the mood for competitive game play. Rather than "not play Aion" to satisfy these moments, there are certainly other options available but they require some further thinking on your part. Being a PvPvE game, Aion is a colourful mixture of playstyles so I believe it is important to form a strategy early to allow greater flexibility and ultimately make the most of your game subscription


How to Avoid Unwanted PvP in Aion:
1. Know Your Zone
First and foremost it is crucial for any player to understand the PvP risks within the area they are playing in. Knowing whether the enemy faction can enter the zone you are playing in, as well as where they can enter from, can play a huge part in your overall strategy. It is of particular importance for you to understand what level you will be when you are playing in the area, as well as what level the enemy faction may be when they infiltrate.
PvE Only Zones:
Firstly, the following areas within Atriea cannot be infiltrated by the enemy faction. They are completely separate and therefore can be considered entirely PvE zones where you will not encounter the enemy faction at all. You will notice though that the NPC enemy level only extends as high as 25, so there is only so much grinding you will be able to do to level up in these areas.
| Zone Name | Race | Your Quest Level | NPC Enemy Level |
|---|
| Ishalgen | Asmodian | 1-10 | 1-10 |
| Pandaemonium | Asmodian | 10-50 | None |
| Altguard | Asmodian | 10-20 | 10-20 |
| Brusthonin | Asmodian | 20-25 | 20-25 |
| Poeta | Elyos | 1-10 | 1-10 |
| Sanctum | Elyos | 10-50 | None |
| Verteron | Elyos | 10-20 | 10-20 |
| Theobomos | Elyos | 20-25 | 20-25 |
PvPvE Zones:
The following areas within Atriea can be infiltrated by the enemy faction. Infiltration is done by accessing various temporary rifts on the map, so it is crucial to study the maps for these zones and learn where the rift exit points are likely to be. A good overview of Rift access points is available -->here.
It is important to note that in these areas there is a large gap between the expected starting level you will be when you arrive in the zone (based on the quest requirements for the zone), compared to the level of players that may infiltrate via the rifts in that area.
Although the rifts are spread out across the map, the zones themselves are totally connected, so it is possible (for example) for a level 20 player in Morheim or Eltnen to find themselves under attack by groups of enemy players of level 45 that have made their way north from a higher level rift entrance. For this reason it is recommended to always be on your guard when playing in any of the PvPvE areas listed below.
| Zone Name | Race | Your Quest Level | NPC Enemy Level | Player Enemy Level |
|---|
| Morheim | Asmodian | 20-40 | 20-45 | 20-45 |
| Beluslan | Asmodian | 30-50 | 35-50+ | 30-50 |
| Eltnen | Elyos | 20-40 | 20-45 | 20-45 |
| Interdiktah | Elyos | 30-50 | 35-50+ | 30-50 |
| Abyss (incl Reshanta) | Both | 25-50 | 25-50+ | 25-50 |
2. Use Early Warning Chatlog Alerts
This is perhaps the most useful tip I have come across (passed on to me by Pepper during CB6). It is actually possible in Aion to setup an early warning chatlog that will alert you to the presence of the enemy when they are as much as two full radar ranges away from you. This gives you plenty of time to either run for cover, use your return skill, call for help, find allies to fight with, or simply log out of the game and come back later when the coast is clear.
Some people are put off by the possibility of enemy infiltration teams who can appear out of nowhere and kill you before you can react. Often by the time you see the enemy on your radar or screen, it is far too late to run for cover or shout for help. The early warning chatlog will help to greatly reduce this problem.
The Early Warning Chatlog:
To setup the early warning chatlog, you will need to do the following within Aion:
- Select the "Combat" tab within your chat window.
- Right click on the name of the tab and select "Tab Options".
- Scroll down and expand the section called "Combat Options - Third Party"
- Tick all 5 of the options called "Enemy's Attack", "Enemy's Attack Skills", "Enemy's Buff Skills", "Enemy's Periodic Effects" and "Enemy's Defense".
- Click on the colour next to each of these 5 options and set it to a very bright colour (i.e. Bright Red).
- When you are finished changing the colours, click the "Change" button at the bottom.
- Lastly, left click and hold the "Combat" tab and drag it to somewhere visible at all times (i.e. I put mine directly above the main chat window).
Example Configuration:
Here are some pictures of a good Combat Tab configuration:
What it Looks Like:
With this configuration you will receive advanced warning when the enemy faction is approaching you (or when you are approaching them ), often before they even know you are there. Below is an example of the things you will see pop up in your combat tab when it is configured in this way. Basically, if you see red text start popping up then you need to prepare for an attack by the enemy faction.

3. Use Kisks in Zones with Infiltration Access
If you know the area you are playing is subject to infiltration but you plan on questing there anyway, I highly recommend looking for a good location to store a kisk (temporary bind point) closer to where you will be questing so you can recover safely if you are killed unexpectedly. This is perhaps one of the most useful tricks you can use in your planning arsenal. The amount of safe locations for kisks are almost limitless so be prepared to spend some time exploring.
Choosing Your Kisk:
Kisks themselves aren't very expensive - the small ones only cost approximately 30,000 kinah and allow 6 people to bind to it. Here are just a few of the many types of kisk stones available:
Choosing A Kisk Location:
The best kisk locations are those that allow you to either resurrect at an elevated location, those that you can only get to from a lot of complicated effort, or those where you can actually "glitch" your kisk inside another item so that it cannot be seen (i.e. a tree, mushroom, snowball, or bush).
Here is a good example of a very elevated kisk location that could only be reached by climbing one wall, gliding to another, climbing a nearby mountain top, diving to another point, gliding again...then finally dropping mid-glide onto the location, taking a reasonable amount of damage on impact. Using a spot like this is good because even if the enemy saw you resurrect here, it would take them a considerable amount of time to work out how to get to you and if they did they would arrive badly injured, by which time you would be fully regenerated and have the advantage.
 | This image has been resized. Click this bar to view the full image. The original image is sized 1259x948. |

If the Enemy finds your Kisk:
If you are unlucky enough to have your kisk found by the enemy, there are two things that could happen.
The enemy could decide to destroy your kisk, in which case you will receive a warning telling you that your kisk was destroyed. Be careful not to confuse this message with the one you get when your kisk has expired after 2 hours because they are identical messages. Always take note of the time when you plant a kisk so that you can work out whether the message you are receiving is because your kisk expired, or because the enemy discovered your hiding spot and destroyed it. If it is the second option then you will need to find a new hiding place in future.
On the other hand, the enemy could decide to "camp" your kisk, in which case they will wait for you to resurrect at your kisk point then kill you instantly, while you are still under soul sickness. Unfortunately, you will not know whether your kisk is being camped until you arrive, by which point it will be too late. The important thing to remember in this situation is that when you are bound to a kisk you always receive an "option" to resurrect at either your kisk point or your main bind point. You are not forced to resurrect over and over at your kisk at the mercy of the enemy. Therefore, if you find your kisk being camped, you can just select your main bind point to resurrect away from the situation.
The important thing to remember about a kisk is that it gives you some more "options" for resurrecting.
4. Learn the Zone Exit Points
Within each map there are what I refer to as "exit points" which allow you to travel to or from the next zone available to your race. These exit points are normally found at the end of a path that appears on the map as a dead end, however in most cases there is a portal gate providing access to the next zone. When you run through these exit points the enemy race are not able to follow you, which is useful to know if you are being chased.
Example Exit Point:
A good example of a zone exit point is in Morheim (an Asmodian area) in the North-East most point of the map (see the red X in the map below). This exit point leads directly to Altguard, which is a PvE only zone. It is not possible for the enemy to be waiting for you on the other side, so if you are on the run then this is a good direction to head in

Picture of an Exit Point:
Here is a picture of what the exit points themselves look like. The exit point pictured is the one in the South-West of Morheim, which leads directly to Beluslan when you walk through it:
| This image has been resized. Click this bar to view the full image. The original image is sized 1259x948. |

5. Use Consumables
Perhaps one of the more obvious, but still important, tactics is to carry a good supply of consumable items to give your character an edge when it comes to fleeing from an unfavourable PvP encounter. If you find yourself being approached by an unruly enemy mob while you are solo questing, perhaps the best tactic to avoid being fish-food is to put on some speed boosts and high tail it toward some allies.
Some Examples of Consumables:
Some consumables can be crafted, some can be gathered, some can be obtained from doing quests, while others can be purchased from NPC vendors. Here are just a few of the many, many types of consumable items available:
6. Watch The Map for Slayers
When Aion is finally released in the NA/EU territories, the PvP "Slayer System" will be implemented within the game to provide some minor penalties and rewards for PvP relating to player infiltration.
Perhaps the most useful part of the Slayer System is the "Curse/Judgement" effect that players will come under once they have killed a certain number of players of a lower level to themselves. Once under a Curse or Judgment, the location of the player will be revealed throughout the local map. Also, even if the enemy is under hiding skill, their title will be seen, making it easy to be spotted.
With this is mind, it will be important to watch the location of these "Slayers" on the local map while you are questing if you want to avoid getting pulled into a confrontation.
~~ The End ~~
This is my first draft of the guide so I would be grateful if people could give me other tips/pointers to add

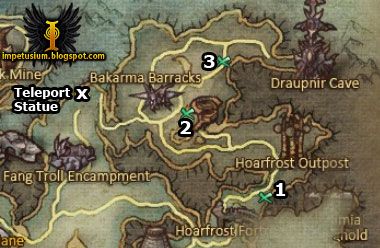 Since i explored again in areas i should not run around in with my level *grin* I figured i post something useful from todays travels. The Draupnir Cave (instance for lvl ~43-50) entrance is in the middle of an elite area. If you want to go there fighting your way through can be quite annoying. To speed things up you can use a small shortcut. Since i traveled there today anyway i took a few screenshots to make it easier for those that have not been there.
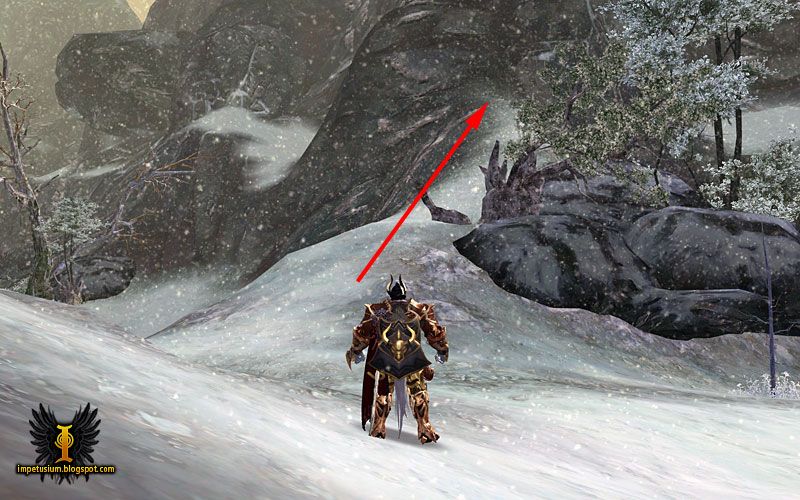
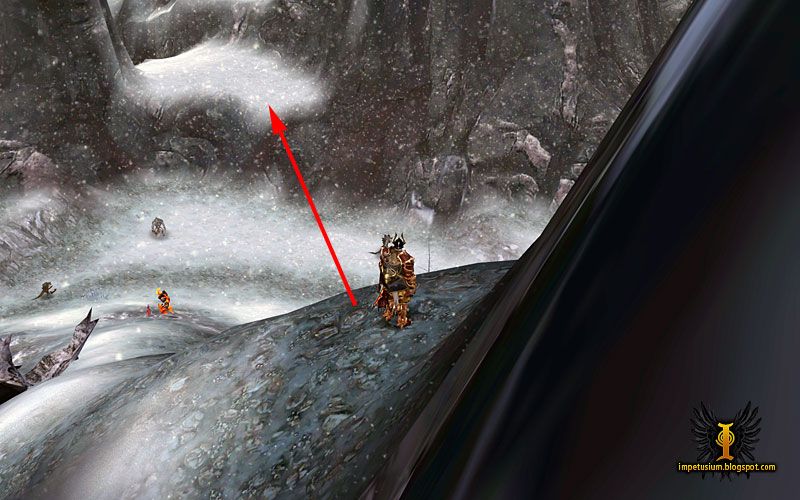
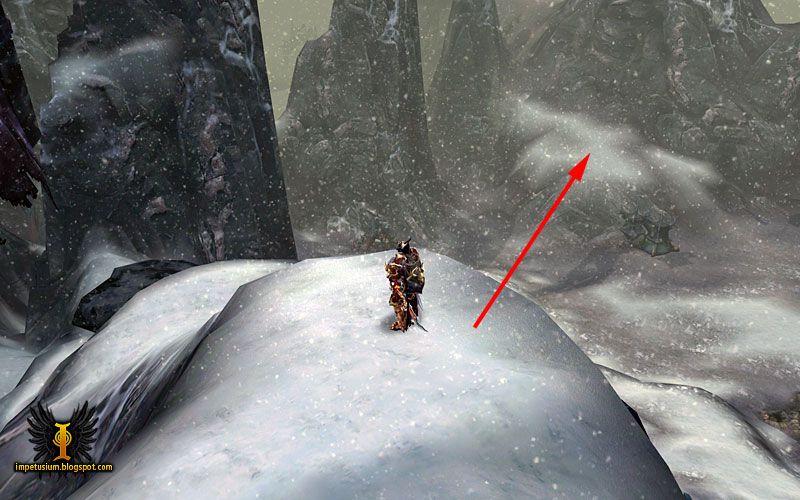
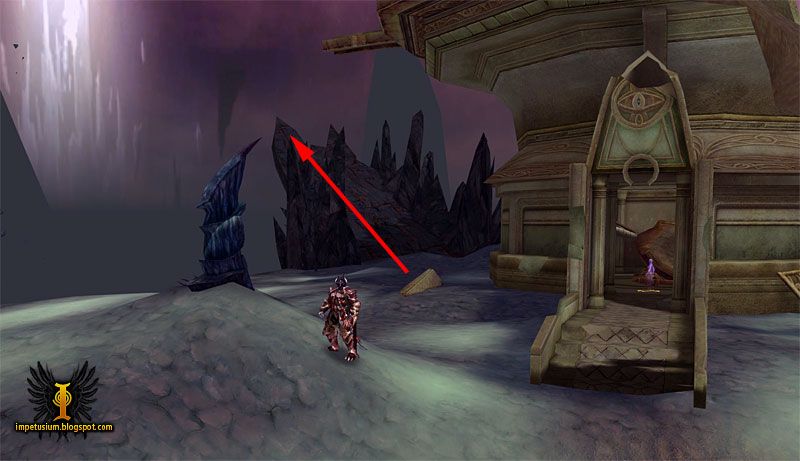
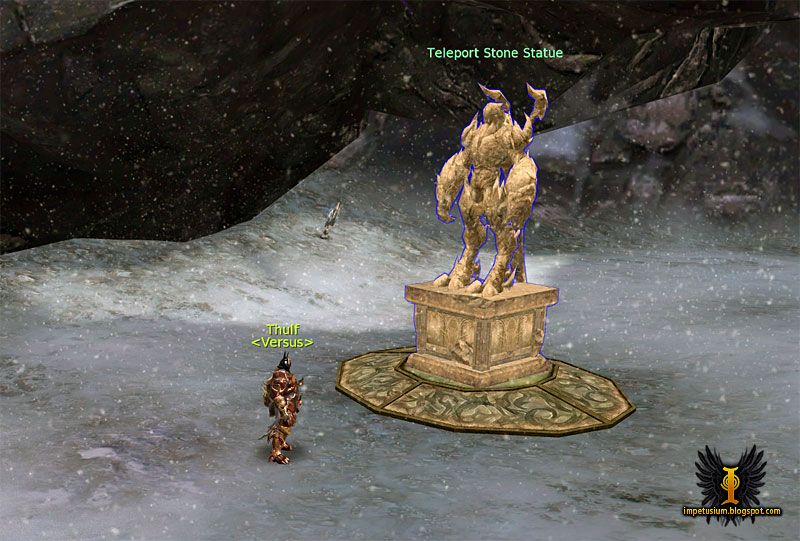 While many know this shortcut, there is another way you can use as well: North of the Fang Troll Encampment is a Balaur Teleport Stone Statue, position is marked on the initial map. Using this statue will teleport you up the mountain above the statue location. From there you can climb the mountain to the left and glide towards position 3 as well. You'll not make it in one glide but can land close to the mountain and sneak through the elites from there without hassle. I did not time each way, so no idea which one is faster. It will probably depend from where you are traveling. Tho if you come from Red Mane, the statue might be slightly faster IMO.


